Along with making the glass pieces, sometimes it's nice to be able to offer the supporting pieces as well, like frames for paintings, candles or soap for the little blown glass pieces, or the actual pedestal stands, known as fonts, for the big cast glass Baptismal basins. They add a lot for the client to be able to get the complete set up in one place so they don't have to go driving around looking for each part. We were fortunate to receive an order for one of our Cast Glass Aqua Blue Splash Baptismal Basins (a very popular one!) with an accompanying handcrafted wood font to hold it.
Many artists only concentrate on a narrow choice of media in which to work, but I find it exciting to be able to switch from such different media as blown glass to woodworking. They seem to use different sections of my creative brain, so it lets the "glassblowing" brain rest and recuperate while the "woodworking" brain takes over.
Then when the woodworking is done and I go back to glassblowing, I'm refreshed and coming up with new ideas even though I've actually been working on commissions the whole time. It's like letting my glassblower take a vacation while the rest of me goes to work. I find I have very little burn-out by allowing myself these radically different choices.
When we got the order for the bowl and accompanying stand, I created the bowl first and then went to work on the font. First up was to create the eight identical leg turnings that would support the table for the bowl. Taking 29" long 4x4 squares of solid cherry wood, I used my lathe to turn them down to what BJ had previously designed. I had marked on the pieces where the bumps and valleys would be so that they would all be the same. Granted, the design is not overtly complicated, so mostly it was making sure the bumps from leg to leg were the same distance from top and bottom. The legs are only a few inches from each other, so any variations would be very evident.

You can see in the photo that I already have a couple of them carved, laying on the bench behind me. Once they're all carved and sanded smooth, I go ahead and stain them right on the lathe. This makes it less likely for any spots to form where they might be laying on a table or something. The stain is applied and buffed out on the lathe so nothing is touching or messing it up. Then I move on to the base and table.
BJ has designed a really cool star base made of solid oak. The piece is done in three layers with the bottom two layers being made of two pieces each, cut and fit to each other and then rotating the bottom and the middle piece so the seams don't all line up with each other.
The top layer, though, is made of eight little pie wedges, each cut and edge routed separately and then sanded to fit each other and fit onto the bottom and middle layers. This is a time-consuming part of the process, getting them all to fit by barely skin cutting each until they hum into alignment. This is not my favorite part... It took a loooong time!
The table top that will hold the bowl is made of two layers of solid oak. The edge is eight sided, like the base, but is smoother. Since it will be so close to people who are using the Baptismal bowl, we don't want to have anyone catching their sleeves or hands on any pointy bits and possibly knocking the font or bowl around.
The table is made of two sections per layer and then fit together and edge routed for a really nice decorative profile that leads away from the bowl and down into the legs. A hole is cut in the center of the table for the bowl to fit down into. This holds the bowl more securely, and also allows for a tap light to be put on a little shelf to light the bowl from underneath. These bowls are just stunning when a bit of light comes up and through the bowl and water. Wow.
Once the base, the table and all of the legs are created, it's time to fit them together! BJ has designed the whole thing in 3D on his computer, so he prints out the exact drawings for me to follow, with the exact measurements. As long as I can get pretty darned close to those, it *should* fit! I made a couple of measuring mistakes during the process, but not too much!
The old "Measure Twice, Cut Once" edict was such an overwhelming thought that often I measure 4 or more times, just to be absolutely sure! I started with the legs into the table top, to make sure that the pegs slid all the way in and the table would sit flush on the legs.
Each of the legs is turned with a peg on the top and the bottom to fit into holes drilled into the table top and into the base. If the peg is still a little thick, it has to be turned down a touch so it juuuuust slides into the hole and fits flush against the base or top. I had to true up three ends - pretty good!
 With the legs fitting into the table top, I flip them over and fit them into the base. If I've followed the design well enough, it only takes a little truing up to get the piece to look like the drawing. Once I've trimmed any anomalies and the piece is fitting together nicely, it's time to stain the top and base and then glue the whole thing up!
While the glue dries, I like to have the piece in where I can enjoy it and keep an eye on any glue drips or problems. My kitties always make sure they investigate and strength test any new pieces. Larry, our gorgeous Maine Coon, quickly notes his approval of this new stand. He is sitting down into the hole; on the little light shelf.
Once the glue has set, I put in some additional screws for stability and strength. The whole piece is given another once over with steel wool and it's ready for its final varnish. The varnish has to dry for a couple of days, and the biggest problem is making sure none of the kitties climb on it and become stuck to the varnish!
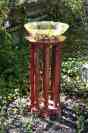
After it has dried enough to be handled, we move it into a beautiful spot to take its publicity photo. Since the bowl that was commissioned for the same place has already been shipped off, I chose one of my Yellow Sun Splash bowls to showcase how it looks when it will be used. The bowls are about 18 inches across. The table top of the font is about 16 inches and the base about 18 inches. It stands about 32 inches tall, with eight little screwy feet on the bottom to adjust for bumpy floors.
What a beautiful work of art this Baptismal Font has turned out to be. It looks like an heirloom, an antique, and we're very proud of it. What do you think? Do you like it?
Peace, Joy
Short URL for this post: //spherical.org/s/8m