I wanted to experiment with my sandblasting and deep carving on glass. My cast glass pieces are usually in the 3/8-1/2 inch thick range, with the colors swirling through the entire depth of the piece. This would make for some great carving, as some of the colors would be opened up, while others would remain untouched.
Since I was getting ready for a space conference, I decided to go with a spacey design. I had a section of glass that for all the world looks like boiling fire, so chose to carve a rocket ship taking off into the front of it. This would be just a display piece, as an example of the type of work we can do on counter tops, sinks, doors, etc.
So, first I had to come up with an idea. I chose to make a stylized rocket, like the '50's rockets with fins.

Half-Hull Sketch
This is my initial sketch. Since the sides had to mirror each other, I mostly just worked up one half.

Flame Blast Sketch
I then worked on the flame blast that would go under the rocket. The piece of glass I have is triangular shaped, so the curlie-Q's contrasted that hard edge wonderfully.

Cast Glass Plate
Here is the actual glass, all polished, trimmed and ready to be covered with the resist so that the sandblasting only affects where I want it to. It's a gorgeous piece with reds, yellows and blacks bubbling up and crashing through the surface. As the piece finished casting, the colors set and the surface flattened down to be completely smooth - a perfect surface to etch and carve into. It is about 18 inches across by about 16 inches deep, weighing about 15 pounds.

Transfer Sketch to the Plate Mask
I have now placed the vinyl sticky resist covering the front of the glass. I'll need another piece on the back and sides so it doesn't get scratched while I'm working on it. I've transferred the sketch of the rocket and flame curlies onto the resist to guide my cutting by hand.

Begin Cutting the Shapes
I've transferred the sketch in great detail and have now started cutting the resist by hand. It's a thin vinyl and I'm using a very sharp scalpel, but it makes my hands sore making sure I keep to the pattern exactly. I cut on every line, with the curlies getting cut on each side so that there is a thin curly line of glass exposed.

Cut and Ready to Blast
When I finish cutting each line, I peel off the beginning sections. If I were surface etching, I'd peel the whole design off and do a fine sandblast over the exposed areas, but since I'm deep carving, I can only do a section at a time so that the sections adjoining will be a different depth to the ones I've carved before.

Blasting Continues
Here, I've sandblasted the curlie-Q's and part of the rocket. If you look closely, you can see that the interior sections of the rocket have been sandblasted, but the exterior sections are still smooth shiny glass, and the very center line still has the mask over it. Now, when I blast the exterior sections, they'll go a little deep, but the interior will go even deeper, leaving a line between the two on each side. After that, I'll pull the center strip and give it some more blasting. This will result in a four-level carved rocket.

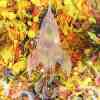
Finished Carving
Here is the finished piece with the carved rocket subtly engraved into the front. It would make a perfect top stone for a fireplace surround.

Up Close
This is a close up of the rocket carving. You can see multiple levels in the rocket itself, plus multiple levels in the curlie-Q flames. It turned out extremely nice, with no oversprays, no gaffes. It took a day for the sketching and mask cutting, but only a few hours for the actual carving.

Finished - with Dobby
This is my curly-tailed kitten, Dobby. He's pretty big, so you get an idea of scale. Couldn't for the world get him to stop moving long enough for the photo. He's a wiggle worm!
What would you use this piece for? Counter insert? Cutting board? Fireplace tile? Freestanding art? Give me some ideas!
More from “The Art of Joy Alyssa Day”


April 6th, 2009 at 5:24 pm
Now just think what a rocket would look like on a wine stopper!
Beautiful piece as usual.
On a large fireplace mantel this would be gorgeous.